Thanks for scanning-by or hopping-by this article, here’s where I’ll help you improve your video creation skills. Videos are incredibly important in today’s digital world, and knowing how to make them well can make a big difference in engaging your audience.
Whether you’re a beginner or have some experience, this guide offers practical tips to enhance the professional look and feel of your videos. We’ll discuss visual planning and creating a storyline flow that can be applied to various video types, including vlogs, tutorials, and reviews.
No matter if you’re creating content for social media, YouTube, or your website, this guide will help you maximize the impact of your videos. So, get ready, grab your camera, prepare to edit, and let’s begin your journey to visual mastery.
I: The Process
Having a structured process involving pre-production, production, and post-production is crucial for creating high-quality content. Pre-production sets the foundation for a successful project by ensuring that all aspects of the production are carefully planned and organized.
PRE-PRODUCTION: Pre-production marks the outset of the content creation journey, where meticulous planning occurs before the cameras start rolling. This phase encompasses storyboarding, scriptwriting, scheduling, logistics, and various tasks essential for preparing the shoot. It is pivotal for ensuring a comprehensive plan, minimizing the risk of missing clips or footage, and facilitating a seamless production process, thereby averting potential costly mistakes.
PRODUCTION: This is the actual filming or recording process where the content is captured. This stage involves setting up the equipment, directing talent (if any), and capturing the footage according to the plan laid out storyline during pre-production. Production is where the creative vision comes to life and requires careful execution to ensure the desired outcome.
POST-PRODUCTION: This is the final stage of the content creation process, where the clips and footages taken is edited, color-corrected, and enhanced to create the final video. Post-production also includes adding music, voice-over (if any), sound effects, and visual effects, as well as any necessary revisions or tweaks to the content. This stage is crucial for polishing the content and delivering a high-quality final video.
II: The Intent: 4E
Before we dive into the techniques, it’s important to understand the various types of intended content creation and how they can impact your content.
EDUCATION: This type of content focuses on providing valuable information, insights, or instructions to your audience. It is ideal for scenarios where you want to teach your audience something new, clarify complex topics, or share your expertise. Educational content can help establish your authority in your field, build trust with your audience, and position your brand as a valuable resource.
EMOTIONS: Emotion-based content aims to evoke specific feelings or reactions from your audience. It is effective in scenarios where you want to create a strong emotional connection with your audience, such as inspiring them, making them laugh, or even bringing tears to their eyes. Emotion-based content can help humanize your brand, increase engagement, and make your content more memorable.
ENTERTAIN: Entertaining content is designed to captivate and amuse your audience. It is perfect for scenarios where you want to lighten the mood, provide a break from serious topics, or simply entertain your audience. Entertaining content can help increase engagement, boost brand awareness, and create a positive image for your brand.
EMPOWER: Empowering content is intended to inspire, motivate, or empower your audience. It is ideal for scenarios where you want to encourage your audience to take action, overcome challenges, or achieve their goals. Empowering content can help build a loyal and engaged community, establish your brand as a positive influence, and create a sense of connection with your audience.
III: The DO NOT
A- Do Not Underexpose
Try not to include footage that is very dark and hard to see clearly.
B- Do Not Overedit
Keep edits subtle. Overediting can make videos look unnatural and detract from their quality.
C- Do Not Oversaturate or Misbalance White
Avoid making colors too intense or incorrect. Oversaturation and poor white balance can distort the image.
D- Do Not Ignore Composition Rules
Learn and follow composition rules before trying to break them. Poor video composition can ruin a video’s impact.
E- Do Not Use Distracting Backgrounds
Ensure the background complements, not distracts from, the main subject.
F- Do Not Forget a Focus Point
Always have a clear main subject. A video without a clear focal point can be difficult for viewers to relate to or understand.
G- Do Not sudden shakes or drops while moving the camera between angles
Avoiding sudden shakes or drops while moving the camera between angles is crucial to maintaining smooth footage. Such movements can be distracting and may result in motion sickness for some viewers. Consistency in camera movements ensures a professional look and enhances the viewing experience.
H- Do Not Move your camera too quickly
Singapore is in the PAL format, which uses a frame rate of 25 frames per second (fps). This frame rate is important because it determines the speed at which the video plays back. Keeping the speed consistent and matching the frame rate ensures a smooth and high-quality video playback.
J- Do Not Use Backlight Without Fill Light
Balance backlighting with front or fill light to avoid dark, underexposed subjects.
K- Do Not Stage All Shots, Capture Moments
While staging can be useful, capturing candid, impactful moments often results in more compelling videos.
L- Do Not Use Bad Posing
Avoid awkward or unnatural poses. Good posing enhances the subject and the video.
IV-The Visual
Angles
Angles play a major role in video and photo content creation because they can significantly impact how the audience perceives the subject or scene. The angle from which a shot is taken can convey different emotions, messages, and meanings, influencing the overall storytelling.
In photography, the angle can determine the composition and visual impact of the image. A high angle can make the subject appear smaller or more vulnerable, while a low angle can make them seem more powerful or dominant. The angle can also affect the lighting and shadows in the image, adding depth and dimension.
In videography, angles are crucial for creating dynamic and engaging content. Changing angles can help maintain the viewer’s interest and provide different perspectives of the same scene. For example, a wide-angle shot can establish the setting, while a close-up can emphasize emotion or detail.
Overall, choosing the right angles in video and photo content creation is essential for effectively communicating your message, evoking the desired emotions from your audience, and creating visually compelling content.
Improving angles in video can significantly enhance the quality and visual appeal of your content. Here are some tips to help you achieve better angles:
- Plan Your Shots: Before filming, take some time to plan out your shots. Consider the purpose of each shot and the message you want to convey. Think about the best angles to achieve your desired effect.
- Experiment with Different Angles: Don’t be afraid to try out different angles to see what works best for your video. Move around the subject and try shooting from different heights and distances.
- Use the Composition Rules: The rule of thirds is a guideline that suggests dividing your frame into thirds both horizontally and vertically, and placing your subject along these lines or at the intersections. This can create a more visually appealing composition.
- Consider the Background: Pay attention to the background of your shots. Make sure it complements your subject and doesn’t distract from it. Adjust your angle if necessary to avoid cluttered or distracting backgrounds.
- Use Movement: Adding movement to your shots can make them more dynamic. Try panning, tilting, or using a dolly or slider to create smooth camera movements.
- Be Sensitive to Light: If possible, use natural light to enhance your shots. Position your subject so that the light is flattering and adds depth to your footage.
Colours
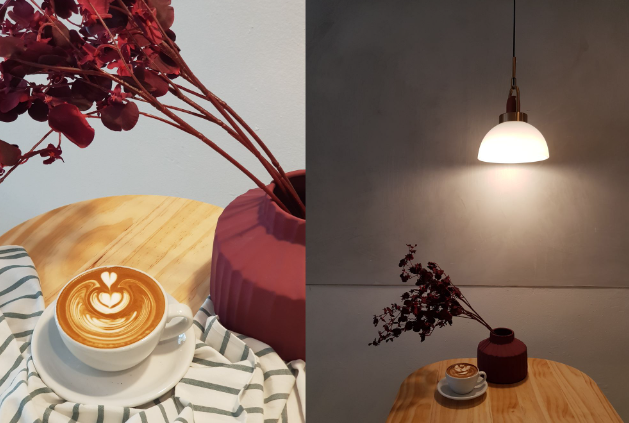
Colors and contrast are crucial elements in both photography and video, as they greatly influence the mood, atmosphere, and visual appeal of your content. By utilizing different tints, tones, and shades, you can create a dynamic composition that adds depth and interest to your images and videos. Colors have the power to evoke emotions and convey messages, making them effective tools for storytelling in content creation. Additionally, the contrast between highlights and shadows can add drama and dimension to your visuals, enhancing their overall impact.
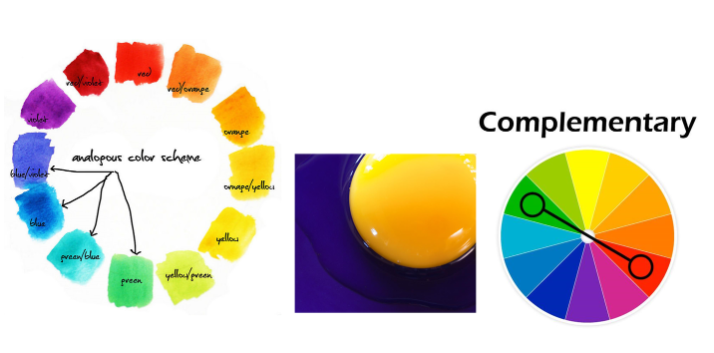
Understanding color theory, including complementary colors, can further enhance your content. Complementary colors are pairs of colors that, when combined, create a strong contrast and reinforce each other. By incorporating complementary colors into your compositions, you can create visually striking images and videos that captivate your audience. Experimenting with different color palettes and contrast levels is key to developing your unique style and creating visuals that resonate with your viewers.
V-Get comfortable with how you hold and move your camera
Getting comfortable with how you hold and move your camera is important because it helps you establish a consistent frequency and sequence for filming your shots. This consistency in movement not only improves the quality of your current work but also lays the foundation for future projects, ensuring a level of consistency that can enhance the overall professionalism and coherence of your body of work.
VI-Know the Editing Techniques
Jump Cuts: Jump cuts are edits that create a jump in the continuity of the footage, often by removing a section of the clip to condense time or remove unwanted content. They are used to create a sense of urgency, increase the pace of the video, or to emphasize a particular moment.
Masking: Masking is a technique used in video editing to selectively hide or reveal parts of a video clip or layer. It is often used to create visual effects, such as blending two clips together, creating animated graphics, or isolating a specific area of the frame for editing.
Cutaway: A cutaway is a shot that is inserted into a sequence to show action or reaction that is not part of the main scene. Cutaways are used to add context, emphasize a point, or provide additional information to the viewer.
L-Cut and J-Cut: An L-cut is an edit where the audio from the preceding clip continues into the next clip, even though the video cuts to a different shot. A J-cut is the opposite, where the audio from the next clip is heard before the video cuts to that shot. These cuts are used to smooth transitions between shots and maintain continuity in the audio.
Match Cut: A match cut is a cut between two shots that are matched in action or composition, creating a seamless transition between the two shots. Match cuts are used to create a visual connection between two scenes or to draw parallels between them.
Cinematic Transition: Using the right transitions can greatly enhance your video by creating a seamless flow between shots, maintaining the viewer’s attention, and enhancing the overall storytelling. Transitions help to establish a rhythm and pacing in your video, guiding the viewer through the narrative and emphasizing key moments. They can also add a layer of polish and professionalism to your video, making it more engaging and visually appealing.
On the other hand, using the wrong transitions can make your video feel awkward and unprofessional. It’s important to choose transitions that match the mood and style of your video. While there’s no exact right or wrong transition, it’s good to learn about different cinematic transitions to make your videos look more polished.
VII-Trend Engagement
In addition to the Comprehensive Guide for Content Creators above, you can enhance your videos by engaging with current trends on social media. Stay updated by actively researching and following trends on social media platforms, news outlets, and other relevant sources. Once you’re aware of the trends, incorporate them into your video content by creating relevant and timely material. Use trending hashtags, music, and challenges to boost your video’s appeal. By tapping into current trends, you can increase your chances of reaching a larger audience and staying relevant in a saturated landscape.
In conclusion, mastering the visual aspects of content creation can significantly elevate your work, making it more engaging and impactful. From understanding the nuances of color and contrast to perfecting your video editing techniques and leveraging current trends, every detail contributes to creating compelling content. As you continue your journey as a content creator, remember that practice and experimentation are key.
Embrace new techniques, stay updated with industry trends, and most importantly, let your creativity shine. With dedication and the right tools, you’ll be well on your way to achieving visual mastery. Happy creating video content!
✧⭒✦✧⭒✦◇◇◇✦⭒✧✦⭒✧
Need More Support or Looking to Learn More?
Looking to expand your skills across all social media platforms? Check out The Ultimate 101: Social Media Platform Guide E-book! This comprehensive guide will help you navigate the unique strategies, tools, and best practices for each major and popular Social Media platform in Singapore. Perfect for creators who want to make the most out of every social network, build a strong presence, and reach their full potential. Get ready to level up your social media game!

✧⭒✦✧⭒✦◇◇◇✦⭒✧✦⭒✧